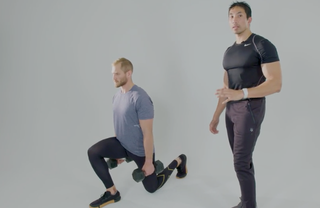
“Leg day” is one of the most daunting two-word phrases for a certain stripe of gym-bro, eliciting nightmares of lower body-crushing heavy squats, leg presses, and deadlifts. These exercises aren’t just hard—they can start to feel boring with your body stuck in one place, your two feet anchored to the floor. But leg day doesn’t have to be a drag. Add some movement and get an even better-balanced lower body workout with the lunge.
The lunge allows you to train unilaterally, or focused on one limb (in this case, leg) at a time. This type of training is essential in that it more closely mimics the movements that you use in every day life than bilateral movements, which use both sides of your body at the same time. Depending on the variation of the lunge you choose, you’ll be able to add more movement into your workout, too. “With the lunge, you get to get a little bit ballistic, you get to get a little bit athletic, and you’re catching just about every part of your leg as you do the exercise,” says Men’s Health fitness director Ebenezer Samuel, C.S.C.S.
Whether you’re doing bodyweight workouts or holding on to heavy loads, the lunge is more complicated than just taking a few steps forward or back. Make sure to take note of the subtleties Samuel and MH fitness editor Brett Williams, NASM-CPT demonstrate in this guide, then put the move into practice for a more well-rounded leg day.
Benefits of Doing Lunges
One of the key perks of the lunge is that it introduces some movement into your lower body training sessions. Whether you take on walking lunges or you’re just stepping forward, then back, you’ll have to rely on balance and coordination to stay upright instead of keeping your feet planted on the floor.
Even better, the unilateral aspect of the lunge means that you’ll be able to home in on one leg at a time. This can help to address any muscle imbalances, which can help to make your bilateral movements (like back squats) even better.
How to Do the Lunge
Follow these form cues to learn how to do the standard lunge. Once you’ve read the step-by-step directions, follow along for some higher-level tips from Samuel to dive deeper into the exercise.
●Stand with your feet shoulder-width apart. Squeeze your glutes, and, and shoulder blades, keeping your gaze neutral at a point straight ahead of you.
●You can perform lunges with only your bodyweight, or use a wide range of implements like dumbbells, kettlebells, or barbells held in a number of positions. For simplicity’s sake, start by holding a pair of dumbbells, one in each hand at hip-level.
● Step forward and slightly out with one leg, landing with your heel first. Work to avoid slamming your knee into the ground. Keep your chest in an upright position, bending your knees to form right angles with both of your legs. Turn on your forward glute muscle to help protect your knees.
●Drive off the ground with your front heel to step back into the starting position. Keep your torso in a solid upright position by squeezing your core to stay balanced.
●Perform 3 sets of 8 to 10 reps per leg, or work for time with 45 seconds on, 15 seconds off for 5 minutes.
Glutes On
Eb says: When you step forward turn your glute on, so your knee shifts slightly outward. People often have a habit of letting their knee shift toward their midline, and that’s the last thing you want. The same way you push your knees out when squatting, you want to create that same motion when you lunge to protect the health of your knee in the long run.
Chest Up
Eb says: Don’t let your chest fall, and don’t let your upper body be a momentum-generator in the lunge. This is a leg move, and you want it to be driven by your legs, not some attempt at rocking your upper body or your shoulders, or hinging forward to get up.
Think about keeping a tight core, and keeping your shoulder blades down and in in a standard lunge; maintain that rigidity as you’re lowering and standing up.
No Back Knee Slam
Eb says: There’s a dynamic quality to the lunge, but this is still a move about control. Exhibit that and control your body as you lower into the lunge, making sure your back knee doesn’t hit the ground or slam into it. You should be in enough control as you lower down that your back knee stops an inch from the ground.
Work in Reverse
Eb says: If you’re not feeling comfortable with the forward lunge, shift to the reverse lunge, which, in many ways, is actually superior to the forward lunge. It’s going to alleviate a lot of stress on that front knee, and it’ll force you to be spatially aware as you step back.
And the best part about the forward lunge (and the reason I love it so much): When you stand up from it, it gives you more natural hip extension, mirroring an action that we need more of in real life.
Once you’re comfortable with the movement, try out these lunge variations.
- Pendulum Lunge
- Walking Lunge
- Jump Lunge
- Pulse Lunge
This content is created and maintained by a third party, and imported onto this page to help users provide their email addresses. You may be able to find more information about this and similar content at piano.io


Comments are closed.